Keeping Echolink connected with an Android Phone
By Doug Wade, KK7BRS
During a recent LWHC meeting I heard the complaint that Echolink on an Android phone has connection problems when the Echolink app is put in the background. As an Android user considering using Echolink, I was curious. I am not a programmer nor do I understand the inner workings of the Android Operating System, but I investigated and thought the results might be of interest to other Android users.
I duplicated the complaint and found my connection dropped only when I left the phone idle long enough to turn the display off. In other words, when Echolink runs in the background it will continue to work correctly until you stop using the phone and the display turns off. While Echolink has a setting to keep the display from timing out, it only applies to sessions when the app is the active (displayed) screen. This may be intentional so that users won’t forget to end the app and stay connected needlessly. The proverbial ‘Out of Sight, Out of Mind.’
I found four ways to allow Echolink to truly run either multitasked on screen or in the background. A caveat: I tested with Echolink version 1.7.6 that was downloaded from the Android Play Store on my Samsung Galaxy S8+ phone, running Android version 9. Hopefully, one (or all) of these options will work for you or at least provide a clue for your solution.
#1 Run only Echolink:
The first option is to use the app exactly as it was designed. Run the app in the active window with no other distractions to put it in the background. Echolink has a setting that is set by default to never allow the display to turn off.
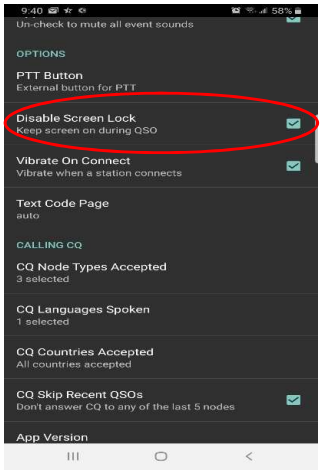
In the app, ‘Disable Screen Lock’ should be selected to keep the screen on during QSO. If you need to use your phone for another purpose, you can run Echolink in the background while your phone display remains active, but you must bring the app to the foreground to transmit or if you aren’t actively using your phone. When Echolink runs in the background, your phone screen timeout overrides the Echolink disable screen lock setting.
#2 Run Echolink as a Split Screen App
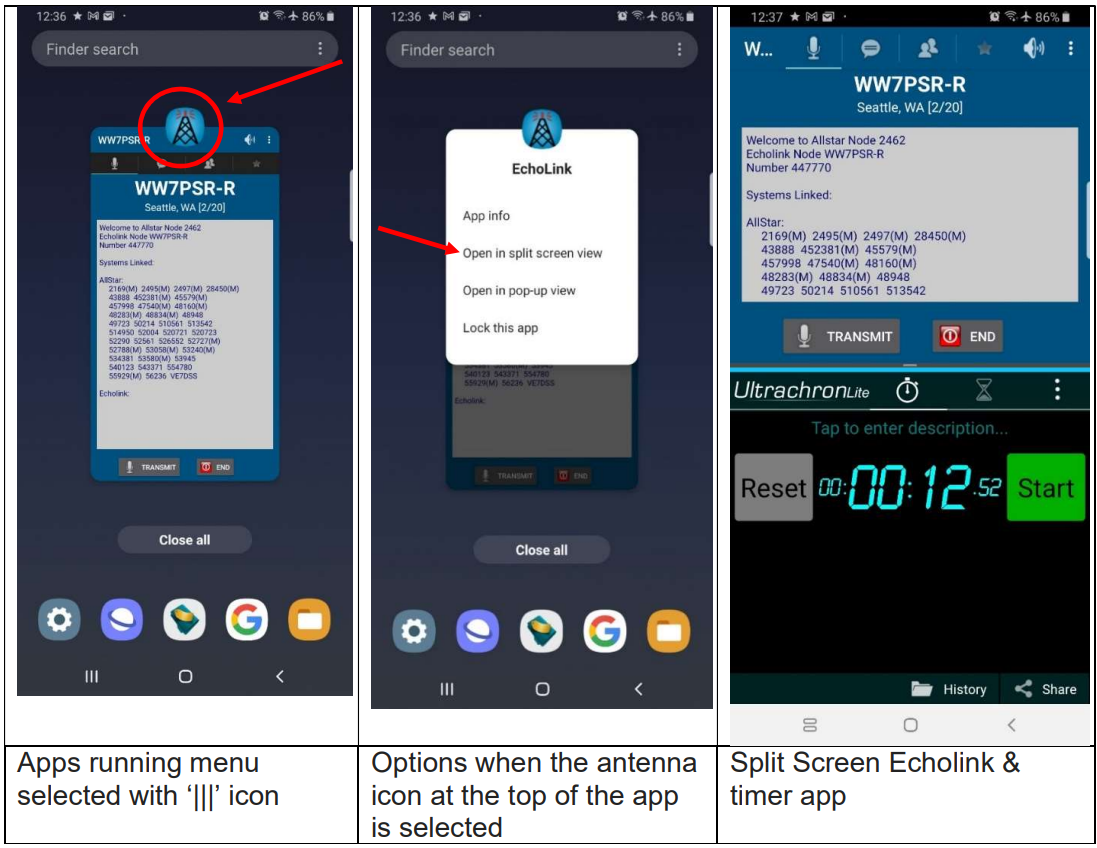
Another method to run Echolink is to run it in a Split Screen. In the split screen, Echolink is multitasked and always ‘On Screen.’ Echolink’s ‘Disable Screen Lock’ takes precedence over the phone display timeout timer and the display will remain active. This method also allows you to use other applications at the same time since the screen will be shared between Echolink and another app. I found it useful to have a timer so I can tell when the 3 minute alligator is approaching. Other times I call up the Voter Scope to see the repeater signals and internet traffic. When you need to transmit, simply select the Echolink screen and press the transmit icon.
Steps to enable the split screen:
1. Press the menu icon ‘|||’ to show the running apps
2. Select the icon on the top of the app, select Echolink Antenna icon, not the app image.
3. Choose 'Open in split screen view'
#3 Run Echolink as a Pop-up window
Following similar steps as in #2, except choose ‘Open in pop-up view’:
1. Press the menu icon ‘|||’ to show the running apps
2. Select the Antenna icon on the top of the app, not the Echolink app image.
3. Choose 'Open in pop-up view'
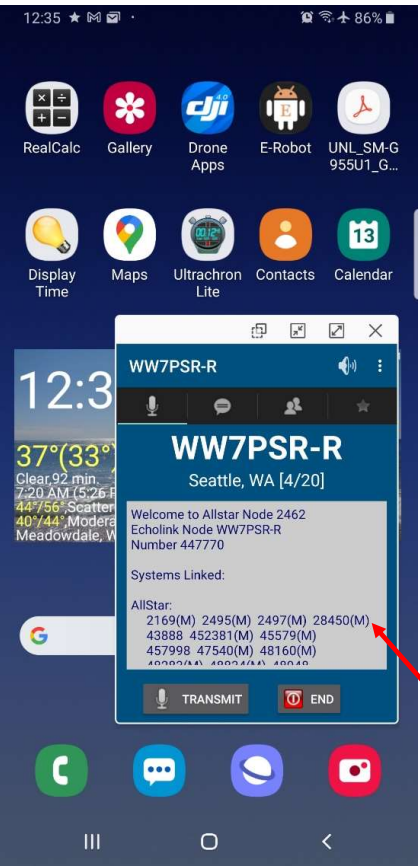
When you select ‘open in pop-up view’ a moveable window of Echolink will appear. This window can be placed anywhere on the screen. The icons along the top of the Pop-up window (from left to right) allow you to change the opacity of the pop-up window using a slider bar that will appear, reducing the pop-up window to a floating icon on screen and lastly, make the pop-up window full screen. I do not recommend using the floating icon as this defeats the purpose – the floating icon will allow the display to timeout and disconnect Echolink.
For those that do not have these features, it may be necessary to either keep the app in the foreground or use the #4 option which should be available in all versions of Android.
#4 Stay Awake Option
A fourth method of running Echolink in the background is to enable the ‘Stay awake’ option under the hidden 'Developer options'. Once enabled, ‘Developer options’ will appear as a category under Settings. The phone must be connected to a charger if using the stay awake option to control the display timeout.
If you are using your phone for navigation and Echolink during a SAG event or emergency when you need to find a location but need to concentrate on your surroundings and other more immediate duties, this may be the preferred method to keep your phone display continually active, but again the phone must be charging for the ‘stay awake’ setting to override the display settings.
I should point out the risk when un-hiding the Developer category; manufacturers hid it for a reason. There are many Developer options that may be changed, but I don't recommend you make changes unless you are willing to do your own research about those options and be ready to accept consequences for any problems that may arise.
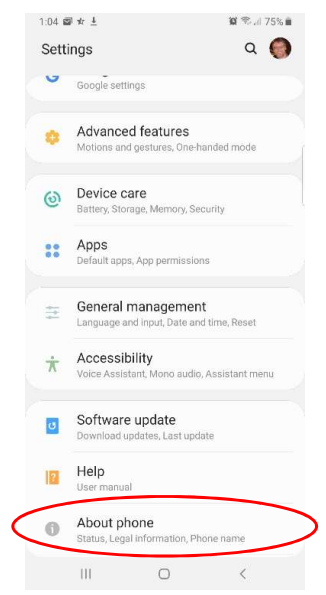
Enabling the ‘Developer Options’ needs to be done once, after which the ‘Developer Options’ category will appear in Settings, beneath ‘About Phone.’ To begin, first check whether developer options have been previously enabled. Within Phone Settings, scroll to find if the ‘Developer Options’ category is found and skip to step 4 in this section. Otherwise, follow the steps to enable the developer options.
Enable the Developer options:
1. Open the phone Settings and select 'About phone'.
2. Next Select 'Software information' from the 'About phone' screen.
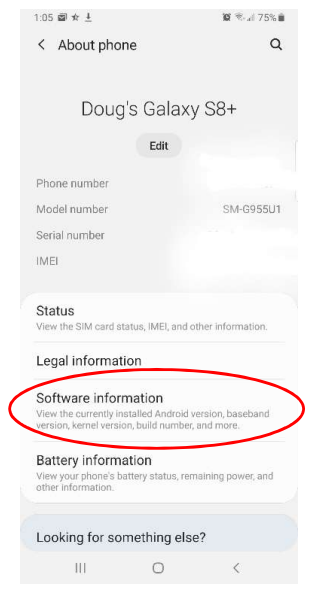
3. Now you need to enable the hidden Developer Options by tapping multiple times (about 4 to 6 times) on 'Build number'.

A message should appear saying the Developer Options are enabled. It is possible that the options are enabled, and a message will appear indicating they are already enabled.
4. Go back to the phone's Settings and you should see a new selection called 'Developer options'.
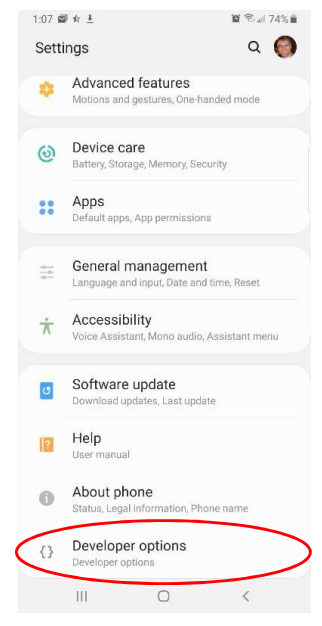
5. After Opening the 'Developer options' screen, find and turn on the 'Stay awake' option.

You can now exit back to the phone's main screen, plug in a charger and the screen will never time out until you unplug the charger or turn off the 'Stay awake' option. Echolink can be put in the background and another app can be used full screen at the same time!
If you don't want the display to stay on, as a bonus, you can briefly press the power button to turn off the display and lock the phone but still have Echolink stay connected!
It will cause connection problems when Echolink is run in Split Screen or Pop-up mode if the screen is blanked with the power button.
Some of the cons to any of these methods is that the display is always on or the phone is locked. If the phone is not locked, it does pose security risks when you leave your phone since it will not time out and lock because the display won’t turn off. Also, if the phone is left charging over long periods of time (every day for many months or year(s)), the icons will burn a ghost image of the icons if they are not rotated from time to time. By that time, you're probably looking for a new phone anyway. If you lock the phone when using the ‘Stay awake’ option, you now have to unlock the phone to use Echolink. Again the ‘Out of sight, out of mind’ may leave Echolink unnecessarily connected because you forgot it was running.
And remember, this could all change with the next version/update of Echolink or Android.
In the meantime, I hope your version of Android OS & phone model play well together and give you the above options to make Echolink reliable and worthwhile on your phone.
Be safe and use this knowledge wisely.
73,
KK7BRS – Doug
(Editor's Note: The same technique shown here can be used for other Android applications, such as APRSDroid, when you wish to keep beaconing your APRS position while using other apps in the foreground.)
La búsqueda gana coherencia cuando se determina la necesidad de una prenda suelta o una equipación completa. Para reducir errores, es importante distinguir las imágenes de muestra de las fotografías del producto. Para ampliar la información, conviene consultar «» y revisar recomendaciones prácticas relacionadas con el tema. Antes de confirmar la compra, conviene revisar el precio total indicado.